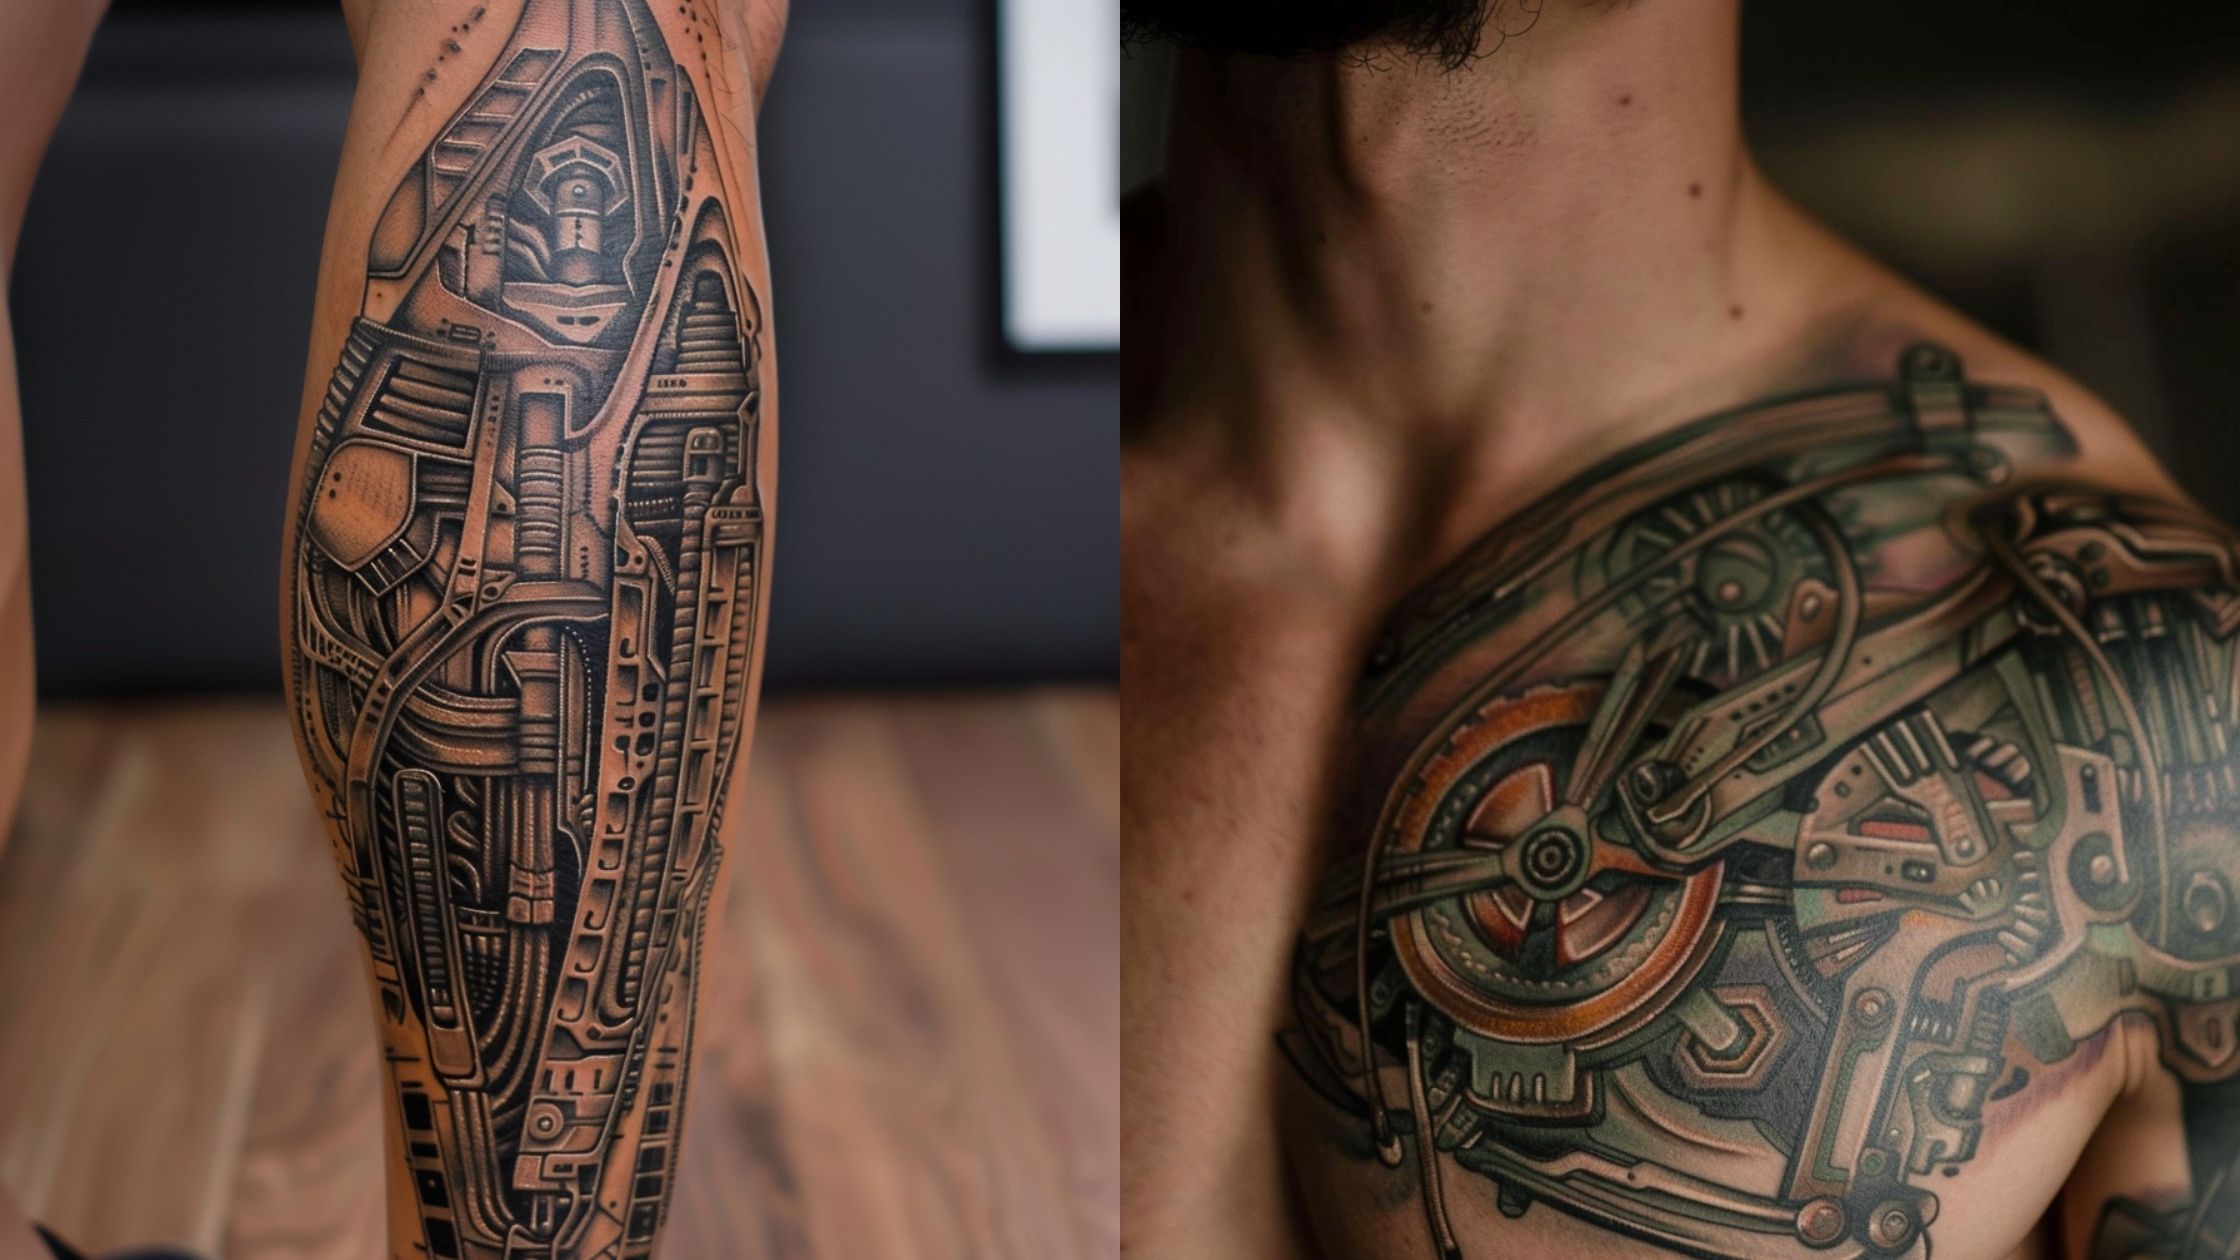
A biomechanical tattoo only works when the machinery agrees with the body underneath it. That is the whole style in one sentence, and it is the thing most reference photos on Pinterest quietly get wrong.
I have spent a long time looking at this genre, and the pieces that stop me are never the ones with the most gears. They are the ones where a piston sits exactly where a tendon would be, so your eye believes it for a second before it catches up.
Below are 30 biomechanical tattoo ideas organised by placement — sleeve, leg, back, chest, hand, shoulder, rib, spine and hip — because placement is genuinely the first decision in this style, not the last one. If you are still deciding on scale, the full sleeve tattoo guide covers the commitment side of it.
The style traces back to the Swiss artist H.R. Giger, whose “biomechanical” airbrush work and creature design for Alien won an Academy Award for Best Visual Effects in 1980. Almost everything in this article is a descendant of that visual language — you can see the source work at the official H.R. Giger site.
Which Biomechanical Style Is Right for You?
Biomechanical is not one look. It is at least five, and they cost different amounts of chair time.
| Approach | What It Looks Like | Typical Session Load | Best For |
|---|---|---|---|
| Torn skin / reveal | Skin peeled back to expose machinery underneath | Heavy — most artists quote multiple full days for a limb | Arms, thighs, chest, anywhere with a flat plane to “open” |
| Full mechanical replacement | The limb is simply a machine, no skin at all | Heavy, but faster than reveal work — no skin edges to render | Full sleeves and full legs |
| Biomorphic / Giger-style | Organic ribbed forms and tubing, no recognisable machine parts | Medium to heavy depending on scale | Backs, ribs, anyone who wants texture over storytelling |
| Cyborg / hard surface | Clean armour panels, screws, seams, sci-fi prosthetics | Medium — flat panels cover ground quickly | Shoulders, hands, forearms |
| Blackwork biomech | Heavy black, no grey wash, graphic shapes | Medium — but the black itself is demanding to sit through | Darker skin tones and anyone who wants maximum longevity |
When I have watched people choose badly, it is almost always because they showed the artist a Giger-style biomorphic reference and then asked for clean cyborg plating. Pick one language and stay in it.
Why Biomechanical Tattoos Demand More Planning Than Most Styles
Most tattoo styles can be dropped onto a body part. This one cannot.
A rose looks like a rose wherever you put it. A mechanical elbow joint only looks like anything if it sits on an actual elbow, which means the design has to be drawn for your arm and nobody else’s.
That is why good biomechanical artists take photos of your limb at the consultation and draw over them, rather than working from a flat sheet of paper. If your artist does not ask to photograph the area, that is worth a question.
The second planning issue is edges. Biomechanical pieces that stop abruptly mid-forearm look unfinished in a way that a floral piece never does, because machinery implies it continues.
So decide the final outline of the whole project before the first session, even if you are paying for it over two years. In my experience this single decision separates the sleeves that look intentional from the ones that look accumulated.
Biomechanical Tattoo Ideas by Placement
Every image below is a real biomechanical piece, grouped by where it sits on the body.
1. Biomechanical Sleeve Tattoos
The sleeve is the default for this style and for a good reason — the arm has a joint at each end and a natural taper in between.
That taper does a lot of the work for you. Machinery that gets denser toward the wrist reads as engineered, while machinery that stays uniform reads as wallpaper.
The strongest sleeves I have seen commit to a single mechanical logic: either everything is hydraulic, or everything is geared, or everything is armour. Mixing all three is the most common way a sleeve loses coherence.
Ideas worth bringing to a consultation: pistons following the biceps line, a mechanical elbow joint with visible wear, torn skin opening at the deltoid and closing at the wrist, or cabling that spirals rather than runs straight.
Ask for a wrist plan specifically. The wrist is where sleeves either resolve or trail off.
2. Biomechanical Leg Tattoos
Legs give you more uninterrupted surface than arms and far fewer people see them, which changes the calculation for a lot of people.
The calf is the most forgiving area on the whole body for this style — it holds ink well, it is a clean convex shape, and it is easy to sit through.
The shin is the opposite. Thin skin over bone means more discomfort and, in my experience, more touch-ups on fine seam lines.
Design ideas: hydraulic rams running the length of the shin, plating that wraps the calf like a boot, an ankle joint rendered as a machine bearing, or torn skin over the thigh revealing an engine block.
If you are building a leg project in stages, map the whole composition on paper before the first needle touches skin.
3. Biomechanical Back Tattoos
The back is the only placement where a biomechanical design can be fully symmetrical, and symmetry suits machinery.
A mechanical spine down the centre gives you an axis, and everything else can be mirrored off it. That is the single most reliable back composition in this style.
The complication is that the back moves a great deal at the shoulder blades. Rigid plating drawn across that area can distort when you raise your arms.
Good artists solve this by putting the seams and joints exactly where the body already creases, so the movement becomes part of the design instead of a flaw in it.
4. Biomechanical Chest Tattoos
Chest pieces let you use the most literal biomechanical idea there is — an engine or a core where the heart sits.
It is a cliché, and it still works, because the anatomy underneath genuinely supports it.
The practical note is that chest skin stretches and shifts more than most people expect over the years, so very fine mechanical detail near the sternum tends to soften first.
Heavier shapes with strong value contrast hold up better here, particularly across the sternum.
5. Biomechanical Hand Tattoos
Hands are the most convincing placement for biomechanical work and the hardest to maintain.
Convincing because the bones, tendons and knuckles are already visible — you barely have to invent structure, just redraw what is there as metal.
Hard to maintain because hands are washed constantly, exposed to sun constantly, and shed skin faster than anywhere else. Expect touch-ups on hand work as normal, not as a failure.
Every artist I have asked about hands says the same thing: go heavier than feels right. Fine hairline seams on fingers rarely survive five years.
More conservative options are covered in hand tattoo ideas if you are not certain about a visible placement yet.
6. Biomechanical Shoulder Tattoos
The shoulder is the best starting point if you might eventually want a sleeve but are not ready to commit.
A ball joint at the deltoid is the most recognisable biomechanical motif in existence, and it stands alone perfectly well as a single piece.
It also extends naturally — down the arm, across the chest, or onto the back — which means a shoulder piece is rarely a dead end.
Design ideas: an exposed rotator mechanism, armour plating sized to the deltoid, or cabling emerging from the neck and disappearing under the collarbone.
7. Biomechanical Spine Tattoos
A mechanical spine is the most on-the-nose biomechanical concept available, and it is still one of the best.
The vertebrae give you a built-in repeating rhythm, which is exactly what machinery needs to look designed rather than random.
It is also a demanding sit. The spine is bone directly under thin skin for its entire length, and this design requires the whole length.
Most people I have spoken to who have one describe it as their most painful piece. Break it into two or three sessions rather than trying to do it in one heroic sitting.
8. Biomechanical Rib and Hip Tattoos
Ribs and hips are where biomechanical work gets its best raw material — a repeating bone structure and a strong curve.
Mechanical ribs are effective because your actual ribcage already does the pattern work. The artist is essentially tracing a rhythm that exists.
Hips are the opposite challenge: a compound curve that changes shape completely between standing and sitting, so the design has to read in both positions.
Both are on the more uncomfortable end of the most painful tattoo spots. Plan shorter sessions here than you would on a calf.
Variations Worth Considering
If straight biomechanical is not quite it, these adjacent directions come up constantly in consultations.
Biomorphic (Pure Giger)
No recognisable machine parts at all — just ribbed organic forms, tubing and shell-like surfaces.
It is harder to explain to people and, in my view, ages more gracefully than hard-surface work because there are no crisp seams to soften.
Blackwork Biomech
Heavy solid black instead of grey wash, treating the machinery as silhouette and negative space.
This is the most durable version of the style and often the best choice on deeper skin tones. Blackwork tattoo ideas shows the tonal range.
Biomechanical Cover-Ups
The dark shadow between mechanical parts hides old linework unusually well, which makes this a genuinely strong cover-up style.
It only works if the new design is built around the old tattoo from the first sketch — not drawn first and forced over it.
Geometric Hybrid
Some artists now blend mechanical parts with clean geometric framing, which reads more modern and less 1990s.
If the classic look feels dated to you, geometric tattoo ideas is worth a look before you book.
Practical Tips and Aftercare
Choose the artist by their healed biomechanical photos, not their fresh ones. Fresh grey wash looks incredible on everyone; healed grey wash separates the specialists from the generalists.
Budget for the full project before you start the first session, because an unfinished biomech piece looks distinctly worse than an unfinished traditional one. Sleeve cost estimates will give you a rough baseline.
For healing, follow the aftercare your artist gives you over anything you read online, including this article — they know what ink and technique they used. Our general tattoo aftercare guide covers the shared basics.
Anything unusual during healing is a doctor question, not a forum question. Spreading redness, heat, pus, fever, or a rash that appears weeks later can indicate infection or an allergic reaction and needs professional medical assessment — the American Academy of Dermatology has plain guidance on what warrants a visit. Never attempt DIY tattooing or at-home removal; both carry real infection and scarring risk.
Once healed, sunscreen is the highest-return habit for this style specifically, because biomechanical work lives on value contrast and sun flattens contrast first. The FDA’s consumer guidance on tattoo safety is worth reading before your first session too.
Common Mistakes and What to Do Instead
Bringing twelve unrelated reference images. Bring three that share one visual language, and say which element you want from each.
Starting on the hand. It is the most visible, most maintenance-heavy placement in the style — start on a calf or shoulder and see how you heal.
Asking for “as much detail as possible.” Detail density is what kills these pieces at ten years. A good artist will push back on this, and you should let them.
Treating it as one tattoo instead of a project. Almost every biomechanical piece worth looking at was planned as a multi-session build.
Still weighing it up? Skull tattoo ideas and abstract tattoo ideas occupy similar territory with a lower time commitment.
Frequently Asked Questions
How long does a biomechanical sleeve take?
In my experience talking to artists who specialise in this style, a full biomechanical sleeve is usually quoted as four to eight sessions, with each session running four to six hours. The range is wide because reveal work — torn skin with machinery underneath — takes far longer per square inch than flat mechanical panels. Sessions are normally spaced three to four weeks apart so each area heals before the next pass. If an artist quotes you a full sleeve in two sittings, ask to see healed photos of that work before you book.
Do biomechanical tattoos hurt more than other styles?
The style itself does not hurt more, but the placements it suits often do. Biomechanical designs want ribs, spine, hip and inner arm because that is where bone and tendon give the machinery something to imply, and those are among the more uncomfortable areas for most people. The other factor is duration — a piece that takes six hours will feel worse than the same design done in two. If you are unsure how you handle it, our tattoo pain chart is a reasonable place to calibrate before committing to a large placement.
Can a biomechanical tattoo cover an existing tattoo?
Often yes, and it is one of the better cover-up styles because heavy black shadow between mechanical parts hides old linework naturally. Every artist I have asked about cover-ups makes the same point though: the new design has to be built around the old one from the start, not drawn first and forced over it afterward. Dark, saturated old tattoos may still need laser lightening sessions first. Bring photos of the existing piece to your consultation rather than describing it.
Do biomechanical tattoos age well?
Generally better than most fine line work, because the style relies on large tonal shapes rather than thin detail. The parts that fade first are the tiny highlights and hairline seams that make the metal look sharp, which is why heavier anchor lines matter. Placements with a lot of friction or sun exposure — hands, feet, outer forearm — will soften sooner regardless of style. Sunscreen on healed work is the single cheapest thing you can do for longevity.
Should biomechanical tattoos be colour or black and grey?
Black and grey is the traditional choice and still the safer one, because metal reads as metal through value contrast rather than hue. Colour can work beautifully for glowing elements, energy cores, or copper and brass tones, but it asks more of the artist and of your aftercare. In most cases I would suggest starting black and grey and adding selective colour accents later if you want them. That order is easy; removing colour later is not.
Quick Summary
- Biomechanical tattoos work by making machinery agree with the anatomy underneath it — placement is the first decision, not the last.
- There are at least five distinct sub-styles: torn skin reveal, full mechanical replacement, biomorphic Giger, cyborg hard surface, and blackwork. Pick one.
- Sleeves and calves are the most forgiving placements; hands, ribs and spine are the most demanding.
- A mechanical spine gives back pieces a natural centre axis to mirror from.
- Black and grey remains the default because metal reads through value contrast rather than colour.
- Plan the full outline of the project before session one, even if you pay for it over years.
- Go heavier than feels right on hands and fingers — fine seams rarely survive long term.
- Judge artists on healed biomechanical photos, and take any unusual healing symptom to a doctor.